This walk-through will
get you started installing the Android Software Development Kit (Android SDK),
installing and configuring the Eclipse IDE for Android development, and
choosing and installing Android Virtual Devices (AVDs) to emulate the Android
environment right on your local computer. After following these steps, you will
be ready to create your first Android application!
1. Download the Android
Software Development Kit (SDK)
The very first step is
to download the Android Software Development Kit (SDK) that will let you
emulate Android on your local computer. It is not too large (only ~30MB,
compared to the monolithic XCode/iPhone SDK, which is almost 4GB!).
After your Android SDK
download is complete, unzip and move the new folder to a permanent
location (*not* your downloads directory). I use a folder in my home directory
(~/Android/android-sdk-mac_x86/) but you can move it anywhere you would like. There
is no wrong location. Wherever you choose will hereby known as $ANDROID for
future reference.
2. Download Eclipse IDE
for Java Developers
When I develop for
Android, I choose to use Eclipse as my Integrated Development Environment
(IDE). Eclipse can be suitably adapted for Android development since you can
get plugins to help with creating your Android project, launching your Android
emulator, and preparing your Android application for the Android Market. It is
not an ideal IDE, but the pros outweigh the cons for Android Development.
From the Eclipse Downloads Page,
choose the “Eclipse IDE for Java Developers. Make sure you are getting the
correct version for your operating system. Eclipse is fairly large (~100MB) but
still a lot smaller than the 4GB XCode for the iPhone!
After your Eclipse IDE
download is complete, unzip and move to a permanent folder. I use the
applications directory in my home folder (~/Applications/).
For OSX users: we will
want to have access to Eclipse.app from within our Applications folder. To do
this:
·
Make an alias of the
Eclipse.app file (CTRL-Click then “Make Alias”)
·
Move the alias into
root applications folder (/Applications/) so that it shows up next to your
other applications
Now you can use
Eclipse just like any other application, including adding it to your dock. I do
this with all of programs that I download that do not have installers (i.e.,
they are just .app files). This may not be a necessary step (I am fairly new to
OSX), so please let me know if there is a better way!
3. Install the Android
Development Tools (ADT) plugin for Eclipse
Next, we will use
Eclipse to install the Android Development Tools (ADT) using Eclipse’s built-in
plug-in system. From within Eclipse:
1. Choose “Help” > “Install New Software….”
2. Click the “Add…” button and create a new
entry:
o
Name: “Android ADT”
(this space is for your own personal use, so name it whatever you want)
o
Location:
“https://dl-ssl.google.com/android/eclipse/” (try just http:// if the https://
does not work for you)
3. Check all the boxes to install all the tools
4. Just keep clicking “I agree”, “Next”, “Yes”,
etc. until it asks you to restart
5. Go ahead and restart Eclipse when prompted to
4. Connect Android SDK
with Eclipse IDE
This next step
connects the Android SDK from Step #1 to the Eclipse IDE from Step #2. In Step
#3, you should have restarted Eclipse. If you have not done so, do that now.
From within Eclipse:
1. Click on the “Eclipse” menu (next to the apple
logo for OSX) and choose “Preferences”
2. Click on “Android” heading in the menu-tree to
open our Android Eclipse preferences
3. Click the “Browse…” button to the right of
the ”SDK Location” box
4. Enter the location of your Android SDK (the
$ANDROID path from Step #1)
5. (Optional) Additional
Android/Eclipse Config
While we are in the
Android section of our Eclipse preferences, let’s change a few more things.
These steps are entirely optional. For these additional preferences, we need to
expand the menu-tree under the “Android” heading:
1. Click on the triangle next to the “Android”
heading in the preferences tree to expand our options
2. Click on the “DDMS” sub-heading
and change the “Logging Level” settings to “Verbose” so that we see
everything that goes on while developing
3. In the “Usage Stats” sub-heading, click the
checkbox to allow Google to know how we are using the SDK (seems fair enough,
right?)
6. Decide Which Android
Platforms You Will Support
This graph will help
you decide which ones are relevant and worth your time. I recommend checking
theAndroid Platform Versions Graph every month or so to see how rapidly it
changes! When I first found this graph less than a year ago, Android 1.5 and
Android 1.6 together represented ~50% of the graph. Today, they are only ~8%.
For me, this dramatic change in Android 1.5/1.6 deployment means that my
efforts will be better spent focusing on Android 2.1+. For you, it may be worth
it to support 1.5/1.6 for those 8% of users. Only you can make that decision.
When deciding,
consider that you will need to test, debug, and provide customer support for
every version of Android that you support, and for each individual device that
runs those versions! For example, deciding to support 2.1 means that there are
a whole host of different hardware devices that you may receive feedback
regarding; whereas supporting 2.3.3 (for right now) only means the Nexus One
and the Nexus S. Just keep that in mind while deciding.
From a resources
standpoint, not only do you need to test and support each version that you plan
to release for, but you also need to have those Android SDKs and Android
Emulators on your machine (which takes up space; which, on my smaller SSD, is a
finite resource). It may not be an issue for your, but it is just yet another
thing to keep in mind.
Finally, no matter
which versions you choose to support right now, make sure to check the Android Platform Versions Graph every month or so to see how it is changing,
and to adjust accordingly. This will let you know when you can stop supporting
older versions of Android and, most importantly, will let you know when you
need to start supporting newer versions of Android as they grow and gain
traction.
7. Install Android SDK
Components
Android is packaged in
such a way that the base Android SDK (downloaded in Step #1) is distinct and
separate from each API version of the Android SDK. This means that for each
version we want to support (from Step #6), we need to download a separate
Android SDK for that version. This can be very annoying when installing (notice
how many steps we have done by now), but in the long-run is a very beneficial
design for us Android Developers. As new API versions are added and old API
versions are phased out, we can install/uninstall the APIs as compnents, rather
than a single huge download like XCode is for iPhone (4GB! I just can’t get over
that! Who has a 4GB download for a minor version change?!)
We need to download
the Software Development Kits (SDKs) for the Android versions that we want to
support. To do this, we can use the Eclipse IDE + Android ADT that we installed
in Step #3. From within Eclipse:
·
Click on “Window” then
“Android SDK and AVD Manager”
·
In “Available
packages”, select the platforms you want to support. You can either choose all,
or pick-and-choose what you want to develop for. For example, 2.1, 2.2, and
2.3.3 are all I care about, so I am using API 7, 8, and 10. In the “Android
Repository” package, I checked the boxes next to:
o
Android SDK
Platform-tools, revision 3
o
SDK Platform Android
2.3.3, API 10, revision 1
o
SDK Platform Android
2.2, API 8, revision 1
o
SDK Platform Android
2.1, API 7, revision 1
o
Samples for SDK API
10, revision 1
o
Samples for SDK API 8,
revision 1
o
Samples for SDK API 7,
revision 1
o
Android Compatibility
package, revision 1
·
In the “Third party
Add-ons”, decide what you are interested in. If you are going to be using
Google Maps (or anything Google beyond Android), you want to install their
APIs. If you want their licensing / billing packages, get those too. I checked
the boxes next to:
o
Google APIs by Google
Inc., Android API 10, revision 1
o
Google APIs by Google
Inc., Android API 8, revision 1
o
Google APIs by Google
Inc., Android API 9, revision 1
o
Google Market
Licensing package, revision 1
o
Google Market Billing
package, revision 1
·
Choose “Install
Selected”, then the “Accept All” radio button, then “Install”. This may take a
while. If it seems like your download has paused, check for any confirmation
dialogs that you need to click “Accept” to. These can sometimes be hiding in
the background.
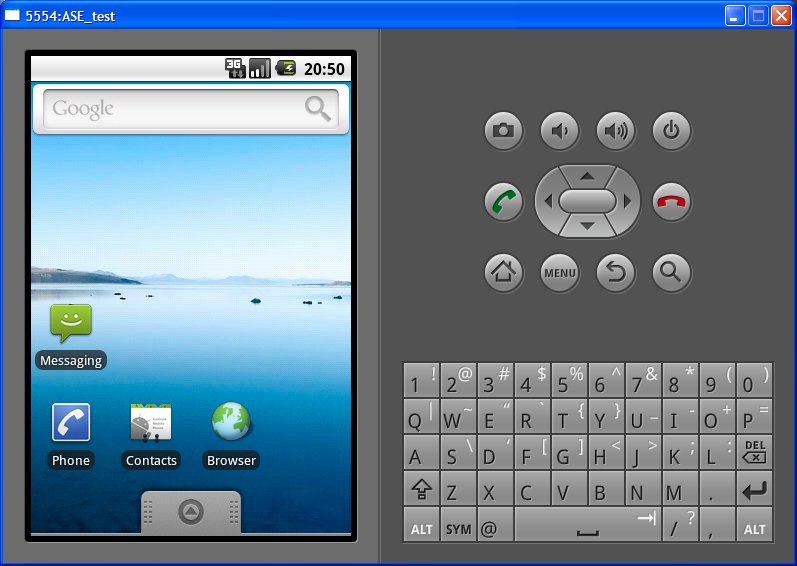
8. Create Your Android
Virtual Devices (AVDs)
Last but not least, we
need to create Android Virtual Devices (AVDs) that will be our Android
Emulators for running and testing our Android applications on our local
computer. In the same “Android SDK and AVD Manager” from Step #7, choose
“Virtual Devices” on the left and create “New…” ones. I like to create AVDs to
represent different Android versions that I want to test, as well as different
hardware specs and screen densities my users are likely to be using.
The main idea is to
test different versions of the Android API, as well as different screen resolutions and
densities. I tend to pair older versions of Android (most likely
running on older hardware) with lower screen densities, and new versions of
Android (most likely running on newer hardware) with better screen resolutions.


 Virt. Memory expansion up to 4.0 GB. Swapfile manager with Top Speed!